

PRINTING ROSES

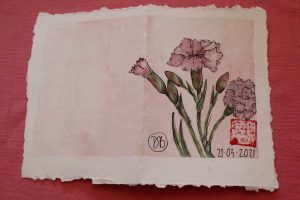
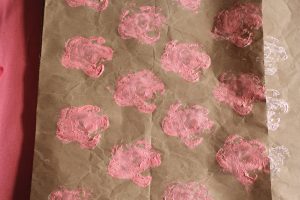
Mother’s Day is only days away so I’m printing some gift wrap with a rose pattern. This could be the easiest craft project you ever attempt! The roses will be pink to go with the pink carnation card I have already painted for my Mother.
You need a bunch of celery, a knife for cutting the celery, a palette or plate for paint, sheets of brown paper or any colour you prefer and acrylic paint for printing. I also used some paper towel for dabbing off excess paint from the celery before printing. If you’re mixing paint colours, as I did, you’ll need something to blend the desired colour. I prefer a stiff paint brush as the bristles really massage the paint and combine the colours.
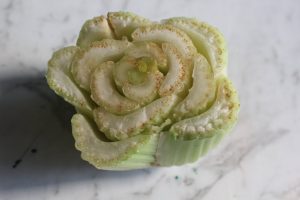
Cut the base from the bunch of celery. (Wash and store the sticks to eat later) Leave the base to dry overnight. When I looked at it in the morning I needed to cut the top flat again.
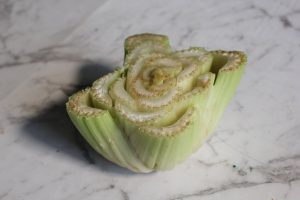
Prepare your work surface and gather your materials. When I looked closely at the base I thought the four outer remnant sticks were not adding to the rose shape of the others, so I cut them off. You could use a rubber band to secure the cut off sticks and print using them if they look more like roses.
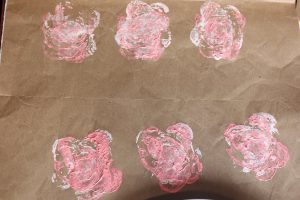
Mix your preferred colour. I wanted pink to go with the pink carnation card I had painted for my Mother. I made a pale pink and a darker pink. Don’t worry if you haven’t mixed enough paint for your sheet of paper. The paint colour is easily matched to what remains on your palette/plate.
Lay you paper for printing on a protected work surface. Squeeze the paint onto the plate or palette, mixing colours if you want a different shade. I used acrylic paints. Dab the celery in the paint. Tap onto paper towel if you need to, then place on the paper. Press firmly. Repeat, creating a pattern.
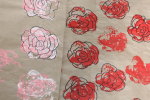
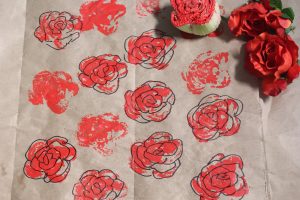
Then I experimented with pale pink over printed with darker pink and also did some darker pink roses. Taking the cue from the black outline I added to the carnations on the card I also did black pen outlines on the printed roses. I used a Sharpie. Prefer the paler prints when they’re outlined in black.
When your prints are dry it’s easy to add leaves if you like, using green paint, felt pen, coloured pencils or even glitter pen. I didn’t but if I was doing this super easy activity with children I’d let them decide if they wanted to add leaves.
I printed on brown paper. I salvaged it at Christmas time. It was the packing paper around a large gift. Later I ironed it to make it smoother but didn’t bother making it perfect as I liked the slightly rumpled look! The paper grips the paint well. I have printed on tissue paper but it’s tricky as the paper sticks to the celery and butchers paper, which works well. I think it would look interesting to print the roses on sheets of newspaper, too.

MY NEW TEAPOT
I don’t drink tea although I love the smell of it! I just don’t like the taste. I drink coffee but try to limit the number of cups I have each day. Looking through the drinks menu at a cafe one afternoon I saw a list of Fruit Infusions and ordered a pot of Cranberry Vanilla. Really liked it and ordered it again a few days later then went hunting for it to have at home. It is sold as a loose mix in a packet.
Initially I made it in a cup using an infuser spoon basket. It was fine but bits of the mix escaped the basket and it took a lot of mix to make each cup of tea.
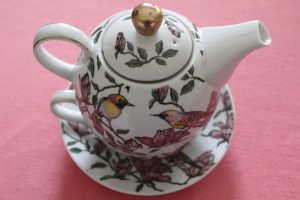
So when I saw this teapot I bought it as it was similar to the teapot used at the cafe. It’s a saucer, cup, pot, stainless steel infusion basket and a lid. And it’s pretty.
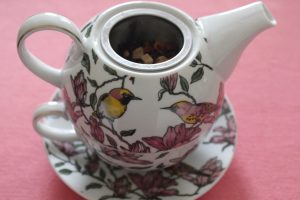
Pour the hot water over the infusion basket full of the loose fruit mix, put on the lid, leave a five minutes. Pour into the cup. No floating bits, full flavour and two cups of tea. The second cup stays hot in the pot for ages.

The same amount of tea used in the infusion spoon put in the stainless steel infusion basket makes twice as much tea!

IN THE GARDEN
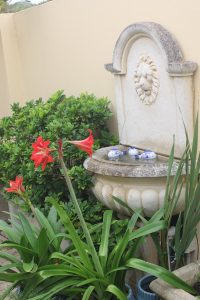
The hippiastra continue to bloom. These are in flower almost all the time. I have had them for many years. The ranunculus corms I soaked before planting have all germinated as have most of the poppy seeds. Unfortunately, the roses are all under attack from chilli thrip and despite spraying them as recommended all except the icebergs look miserable. Too early to prune so I’ll continue to cut back the affected leaves and flowers and spray regularly. Any clever ways to solve this problem?
Did you know milk cartons take about five years to compost?